Ever thought about managing stormwater in your yard? A residential stormwater pit will protect your property from water damage and erosion. But where do you start with installing one yourself?
This guide covers everything you need to know about stormwater pit installation – from choosing the right pit type to connecting it to your drainage system. We’ll give you the tools, tips and expert advice you need to manage stormwater on your property effectively.
Introduction to Stormwater Management
Managing stormwater runoff is essential for protecting your home and landscape from the damaging effects of excess rainwater. In residential areas, a well-designed stormwater drainage system is the first line of defense against water pooling, soil erosion, and costly repairs caused by heavy rain. One of the most effective solutions for managing stormwater is the installation of a stormwater pit. Sometimes called a backyard stormwater pit, which collects and redirects water away from your property.
Whether you’re looking to install a new stormwater pit or upgrade your existing system, understanding the basics of stormwater management is key. In this complete guide, we’ll walk you through everything you need to know from choosing the right drainage solutions to maintaining your stormwater pit for long-term performance. With the right approach, you can manage stormwater runoff effectively, prevent erosion, and protect your property from the challenges of heavy rainfall.
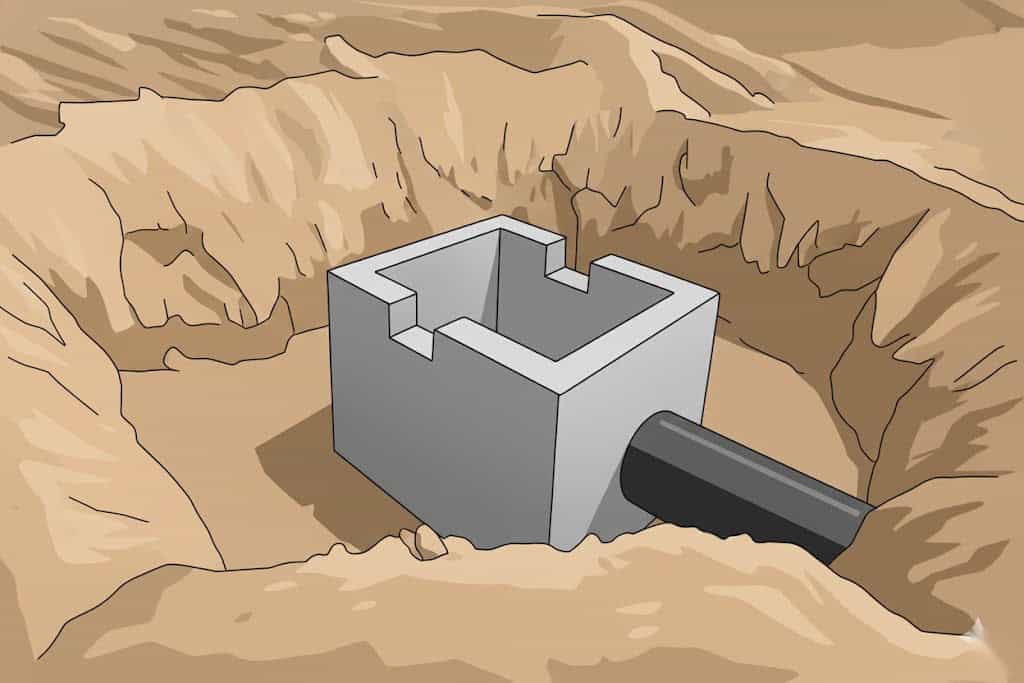
What is a Stormwater Pit?
A stormwater pit is an underground structure designed to collect excess rainwater and redirect it away from your property. Think of it as a collection point that prevents your yard from turning into a pond every time it rains heavily.
Stormwater pits work by:
- Collecting rain, storm and runoff water through grates that filter out debris
- Storing water temporarily so it can be gradually released
- Directing collected water through connected drainage pipes to the stormwater system or a safe discharge area
This simple system eliminates the risk of flooding and protects your landscaping and foundation – making it an effective stormwater drainage solution for Sydney properties.
Tip: The flooding in your yard might not actually require a stormwater pit. It’s possible water isn’t flowing due to partially blocked stormwater drains, so a professional drain inspection is advised before proceeding.
Signs You Need a Stormwater Pit
Not sure if a stormwater pit is the right solution? Here are the telltale signs your property needs better drainage:
Water problems you can see:
- Water pooling in the same spot after every rain
- Puddles forming near your home’s foundation
- Soggy lawn that doesn’t dry out for days
- Water stains or dampness on basement walls
Property damage indicators:
- Soil erosion around garden beds or pathways
- Cracks appearing in your foundation or retaining walls
- Mould or mildew growth on exterior walls
- Plants dying from waterlogged roots
Site factors:
- Your property sits lower than neighbouring homes
- Neighbours’ runoff drains onto your land
- Large roof area or extensive paved surfaces
- You’re in a flood-prone area
If several of these signs apply to your property, a stormwater pit could be the solution you need.
Stormwater Pit vs French Drain: Which Do You Need?
Both stormwater pits and French drains manage excess water, but they work differently and suit different situations.
| Feature | Stormwater Pit | French Drain |
|---|---|---|
| Best for | Concentrated runoff (roofs, driveways) | Widespread drainage across large areas |
| How it works | Collects water at one point, releases gradually | Collects water along its length via perforated pipe |
| Installation | Underground pit with grate | Gravel-filled trench with pipe |
| Visibility | Grate visible at surface | Can be hidden under grass or gravel |
Choose a stormwater pit when:
- You need to manage roof runoff from downpipes
- Water concentrates in one specific area
- You want connection to the council stormwater system
Choose a French drain when:
- Water pools across a large area of your yard
- You need to protect a foundation or retaining wall
- You want a decorative drainage solution
In some cases, you may need both. Our guide on how to install a French drain covers that option in detail.
Types of Stormwater Pits
Choosing the right pit type depends on your property’s needs, traffic load, and budget.
Precast Concrete Pits
The most durable option for residential properties. Precast concrete pits offer high load-bearing capacity, corrosion resistance, and a long lifespan. They’re manufactured off-site and arrive ready to install, reducing construction time.
Plastic Stormwater Pits
Lightweight and easy to install, plastic pits are ideal for low-traffic residential areas. They’re corrosion-resistant and budget-friendly, though they can’t handle heavy vehicle loads.
GRC (Glass Reinforced Concrete) Pits
A lighter alternative to standard concrete, GRC pits suit smaller-scale applications. With no steel reinforcement, they’re a good choice for areas prone to corrosion.
Polypropylene Pits
A step up from basic plastic, offering better durability and load-bearing capacity while remaining relatively lightweight.
Modular Pit Systems
Multiple units can be connected for larger drainage requirements or complex layouts.
Choosing the Right Grate
Your grate choice depends on where the pit is located:
- Plastic grates: Suitable for garden areas with foot traffic only
- Heelguard grates: Pedestrian-safe design that prevents heels catching
- Cast iron grates: Heavy-duty option for driveways and areas with vehicle traffic
Always check the load rating matches your intended use – pedestrian-rated grates will fail under vehicle weight.
Where to Install Your Stormwater Pit
Location is critical for effective drainage. Choose a spot that:
- Sits at a low point where water naturally accumulates
- Allows easy connection to your home’s downspouts
- Provides access to the main stormwater system
- Remains accessible for future maintenance
Position the pit a few metres from your house to avoid water damage to foundations. If you’re unsure where water collects, observe your yard during heavy rain.
Recommended Pit Capacity by Property Size
| Property Size | Recommended Capacity |
|---|---|
| Small (up to 500m²) | 1,000 – 2,000 litres |
| Medium (500 – 1,000m²) | 2,000 – 4,000 litres |
| Large (over 1,000m²) | 4,000+ litres |
Tools and Materials

Before starting, gather:
- Shovel and excavation tools
- Tape measure and spirit level
- Stormwater pit (appropriately sized)
- 90mm or 100mm PVC pipes and fittings
- Gravel or crushed stone for bedding
- Concrete mix (if required for base)
- Safety gear (gloves, safety glasses, steel-toed boots)
How to Install a Stormwater Pit
Step 1: Plan and Prepare
Mark the installation spot and check for underground utilities before digging. Always use the Dial Before You Dig service (1100) to locate pipes and cables.
Step 2: Excavate
Dig a hole slightly larger than your pit. The depth depends on local regulations and your drainage system requirements.
Step 3: Prepare the Base
Compact the soil at the bottom and add a layer of gravel or crushed stone. This prevents settling and aids drainage. For concrete pits, you may need a concrete pad for stability.
Step 4: Install the Pit
Lower the pit into position, ensuring it sits level. Check that inlet and outlet points align with your planned pipe connections.
Step 5: Connect Pipes
Install 90mm or 100mm PVC pipes, maintaining a minimum fall of 1% (1cm drop per metre) to ensure proper water flow. Seal all connections to prevent leaks.
Step 6: Backfill
Fill around the pit with gravel or sand in layers, compacting gently to avoid shifting the pit. Fit the grate flush with ground level.
Step 7: Test
Run water through the system to confirm it flows correctly and there are no leaks.
Drainage Connections
Your stormwater pit needs to connect to both collection points (where water enters) and discharge points (where water exits).
Connecting Downspouts
Measure the distance from each downspout to the pit and install appropriately sized pipes. Dig trenches with a slight slope toward the pit for proper drainage. Understanding the requirements for connecting downpipes to stormwater is essential for compliance.
Connecting to the Main Stormwater System
The pit’s outlet should connect to council stormwater drains or an approved discharge point. This typically requires a licensed plumber and may need council approval.
Absorption Trenches
Where connection to council drains isn’t possible, an absorption trench allows water to gradually soak into the surrounding soil. This option works best in sandy, well-draining soils.
Stormwater Pit Maintenance
Regular maintenance keeps your system working effectively:
- Clean the grate – Remove leaves, debris and sediment regularly
- Inspect twice yearly – Check for cracks, blockages or damage
- Flush the system – Use a hose to clear sediment from pipes
- Check connections – Ensure all pipe joints remain sealed
If blockages persist, professional high-pressure drain cleaning may be required.
Common Installation Mistakes
Wrong Size Pit
A pit that’s too small overflows during heavy rain. Too large wastes money. Calculate capacity based on your catchment area, local rainfall intensity, and council requirements.
Inadequate Base Compaction
Poor compaction causes the pit to settle or collapse over time. Always compact the base thoroughly and use appropriate bedding materials.
Ignoring Future Access
Installing a pit where you can’t access it for maintenance creates long-term problems. Ensure the grate is accessible and not obstructed by landscaping.
Incorrect Pipe Gradient
Pipes laid too flat won’t drain properly. Maintain at least 1% fall throughout your pipe network.
DIY vs Professional Installation
DIY installation suits straightforward projects where you have clear access, no underground utilities, and the pit won’t connect to council infrastructure. You’ll save on labour costs but need time, physical capability, and attention to detail.

Professional installation is recommended when:
- Connecting to council stormwater systems (often legally required)
- Working near foundations, pools, or retaining walls
- Navigating underground utilities
- You’re unsure about local regulations
A licensed plumber ensures correct installation, compliance with regulations, and provides warranty on workmanship.
Regulations and Permits
Before installing a stormwater pit:
- Council approval – Check if your local council requires permits
- Building codes – Ensure compliance with AS/NZS 3500.3 drainage standards
- Stormwater connections – Connecting to council drains typically requires a licensed plumber
- Property boundaries – Your installation must not direct water onto neighbouring properties
Contact your local council or a licensed plumber for specific requirements in your area.
Need Help with Stormwater Pit Installation?
Installing a stormwater pit correctly requires understanding drainage principles, local regulations, and proper construction techniques. While DIY is possible for simple installations, professional help ensures your system works effectively for years to come.
Are you starting to get your head around the complexities of installing a stormwater pit? It requires understanding its function and all of the detailed steps that are involved – so why not get professional installation and expert advice done at a brilliant price? Here at Rapid Service Plumbing in Sydney, we’re your local go-to that Sydney residents really trust for a hassle-free and efficient installation, keeping your property safe and dry with a workmanship guarantee – for life! We are always ready to serve you whether you’re in Kingsgrove, Rosebery, Darling Point, Box Hill, Rozelle, Alfords Point, Beecroft, or be beyond. So get in touch with Rapid Service Plumbing today for true peace of mind.
Key Takeaways
- A stormwater pit collects and redirects excess rainwater away from your property
- Signs you need one include persistent pooling, foundation dampness, and soil erosion
- Choose pit type based on load requirements – concrete for durability, plastic for budget-friendly residential use
- Location matters – install at low points with easy access for maintenance
- Maintain at least 1% pipe gradient for proper water flow
- Professional installation is recommended for council connections and complex sites
- Regular maintenance (cleaning grates, flushing pipes) extends system life